Sunday, January 31, 2010

Valentine's Gift Set


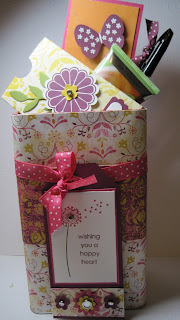
This month, I've shown you how to make the altered Dentyne Gum Holder (January 10th) and how to make the mini note pad (January 12th). Today, I've put them together with Bath & Body Works hand lotion to make a gift for a friend. I used an old tin that held licorice (it was a Christmas gift). I covered the tin with Razzleberry Lemonade designer series paper.

Then I created a tag using the Happy Heart Day stamp set. To get the stamped image different colors, I colored the stamp with Melon Mambo(flower), Old Olive (the stem), and Rich Razzleberry (words), then huffed on the stamp, then stamped it onto the Whisper White cardstock. I used a strip of Razzleberry Lemonade, some in color punched flowers with the Boho Blossoms punch, and finished it off white Rhinestone brads.

The secret to getting this great look was using the same Designer Series paper. It just made everything coordinate. I hope this gives you some ideas!!

Saturday, January 30, 2010

Simple birthday Card


This is a quick and easy card. I used the Sweet Pea Designer Series Paper and the Sweet Pea Felt and some Pretty in Pink ribbon to do the work on this card. I used Well Scripted for the sentiment and stamped it on a Hugs cardstock (the scalloped white piece). I love how it looks and it was soo quick.

C-ya tomorrow!

Lisa

Friday, January 29, 2010

Conversation Hearts Treat Holder video tutorial


Before I talk about this project. I need to tell you something!!

It's snowing!!! It's snowing!!! I haven't seen snow like this in YEARS!!! I grew up in Ohio, but early in our marriage we moved south. I **DO** love the south!! And I really don't like snow, but it's so pretty when it falls. I like seeing the pristine snow from inside a warm house :)

One year we had about a half inch of snow and my daughter managed to roll three snowballs, taking up every inch of snow in our yard, and made a snowman with it. My picture shows a snowman on green grass!! LOL!

We've got a LOT of snow!! I think we're going to get over 6 inches!! My daughter is excited!!! I called my son who is college in Ohio--he wasn't as impressed (as he's been living with snow all winter! LOL!)

Anyway, here is a video tutorial for you! I got these treats at Dollar Tree. They had them in 4 packs for $1. So this treat is economical and quick!!


Until tomorrow--happy stamping!!

Lisa

Thursday, January 28, 2010

Explosion Box tutorials

These are the tutorials that describe how I decorated the inside of my box and the outside. The videos have all the measurements, products used, etc. I also discuss choosing pictures etc. I hope this helps you create an explosion box of your own. Next week I should have the cost of offering this as a kit and I will post that information on my blog.


How to make the structure of the Explosion Box


Here is the video for how to make the structure of the explosion box I showed you yesterday. If you have any questions, please ask. This is the first video I've tried to do of something that is very detailed, so I might not have explained it well enough. I'd be happy to answer any questions. I hope you enjoy making these. They're really fun!

I'm working on editing and uploading the instructions for the inside of the box. I hope to have all those uploaded tomorrow :)
Lisa

Wednesday, January 27, 2010

Explosion Box with Vintage Vogue and With All My Heart


Hey, everyone!

This is the exploding box I was working on yesterday. My daughter has claimed this for pictures for her and her friends :) I hope you like it as much as she does. I'm working really hard on getting the video tutorial together for how to make the structure of the box; I've just got some editing to do for that. I'm also working on filming instructions for how to do the different flaps. I've been doing this between visiting with my family. Today is their last day so it might be late tonight before I can post again. So until then, here are some pictures.

I've also been thinking this might be good to offer as a kit. Let me know if you'd be interested.

Tuesday, January 26, 2010

A late post today

I just wanted to let you know that I'm both visiting with my family and working on a big project. I should be ready to post it, either late tonight or in the morning tomorrow. I filmed part of it today. Sorry to make you wait so long. I hope you think it's worth it.

Lisa

Monday, January 25, 2010

Garden From My Heart birthday card


Hey, everyone!

I'm enjoying my visit with my parents and my neice. We've been keeping busy. I did find time though to film a tutorial for you. I hope you enjoy it.

Lisa

Sunday, January 24, 2010

Sad card to make


Hey, everyone! Today's card that I'm going to share with you is a sad card. It's for my sister and her family. They had to put their dog to sleep this week. That's one of the hardest things to do. We know the heartache of that type of situation, so I made this card for them.

It's a simple card. It uses the D is for Dog stampset. I started with a Kraft cardstock base. I stamped the bone in Very Vanilla Craft Ink and the paw print in Chocolate Chip classic ink. I then hit it with the heat gun to speed the drying time of the craft ink. Then I stamped the dog in black craft ink onto 3/4 of a Top Note diecut on Very Vanilla Cardstock and covered him in black embossing powder. Then I set the image with the heat gun. I finished the front off with red brads and Real Red grosgrain ribbon.

For inside the card, I stamped "Sorry for the loss of your best friend" in Chocolate Chip classic ink onto Very Vanilla cardstock. Then I used the Curly Label punch and punched it out. I then glued this sentiment inside the card. I chose the Curly Label punch because it mimics the shape of the Top Note diecut on the front of the card.

Tomorrow I will be back to filming and posting video tutorials. My neice arrives tonight to visit for a few days. I'm sure she'll enjoy being in my stamping room and sparking my creativity :)

Lisa

Saturday, January 23, 2010

Cool projects


I had the best time at my upline Mary Atwood's class. She always inspires me with her creations and I always come home with new ideas. Today we made two cards and a fabric flower broach. Aren't they neat???!!!

I still have to finish the square scallop card. The flowers need a covering of Crystal Effects. If you haven't ever used Crystal Effects, it creates a hard clear glossy raised surface when it dries. The Crystal Effects on Mary's sample card gave the card just the right touch. I didn't do it at class because I didn't want to travel home with wet Crystal Effects. It takes about an hour to dry. And I knew I could easily do it at home.

What do you think about that flower??? Neat, hunh!! It uses the Stampin Up Flower Folds die. I don't own it, but am really hoping I can get it on my February order. Think of the possibilities. Your old jeans, favorite shirt that has a stain on it but lots of goood fabric. What about thrift store finds, cheap wools, tweeds, silks, etc. Oh, I think this die would be lots of fun!!

For the fabric flower in the picture, we put a pin backing on it. But what about doing a ribbon knot center with the ribbons ends dangling underneat and using those ribbons to tie it onto a purse or on a gift. What about a fabric flower on your belt or a fabric tied belt. I think this would be so fun to play with. You'll be seeing it, if it makes it onto my February order!!

Well, I hope you had a good stamping day like I did. Until next time, happy stamping!

Lisa

Fun projects!!


Today I went to my upline, Mary Atwood's class. I always love going to her classes. She always inspires me. I love seeing what she's created. Today we did three projects, two cards and a fabric flower broach. Aren't these nice??!! I've still got to add Crystal Effects to flowers on the scallop square card. I didn't want to travel home with wet Crystal Effects, so I've got to complete that later. If you haven't used Crystal Effects before, it gives a raised glossy covering when dried. It looks cool on the flowers (on Mary's sample card---sorry you can't see the effect on my card).

Isn't the fabric flower cool? I want to get Stampin Up's Flower Fold XL Die and play some more!! I'm thinking of using old favorite shirts and jeans for fabric. And cheap thrift store finds to get tweeds, wools, silks, etc.... Maybe I'll get it on my February order :)

I hope you were able to stamp today like me. Happy Stamping!

Lisa

I'm going to a class today

Hey, everyone!

I won't be posting a tutorial today because, today I get to go to class!! Yipppeee!! I'm going to my upline and we're making fabric flowers with the Big Shot and some dies. I'm soo excited to do this! When I get home I'll take pictures so you all can see what I made with my upline!

See you later today!! Happy Stamping!

Lisa

Friday, January 22, 2010

Valentine Card using Always and a brayer


Hey, everyone! Today I thought I'd show you how to use the brayer to create this cute and fast card. I hope you like it. I'm having fun using my brayer and hope to bring you more cards that feature this tool.

Thursday, January 21, 2010

Final 3x3 cards for the mini pizza box tutorial

Did you ever figure out what I did wrong yesterday with my pizza box in the picture? It was upside down!! LOL!

Here is a video tutorial for the last two cards. Let me know if you give this a try! Happy stamping!!

Wednesday, January 20, 2010

Video Tutorial---3x3 Cards for the Mini Pizza Box


Hey everyone! I filmed how to make the first two cards for the mini pizza box. The cards are CUTE!! But my camera angle isn't soo cute! Sorry about that!! I know what I did wrong when I set up my camera, so I won't repeat that mistake tomorrow (Lord willing!!). Anyway, I hope the tutorial still helps you out with making these cards. I'll film the other two cards and post them tomorrow.

LOL! Oh, boy!!! I just noticed something funny with how I positioned the mini pizza box in my still photo. Do you see what is wrong? Leave me a comment if you figure out what is wrong with my photo!

If you're local don't forget my class on Friday! Until then, I hope you have fun stamping!!!

Lisa

Tuesday, January 19, 2010

Mini Pizza Box to hold 3x3 Cards Video Tutorial


I want to show you how to make a cute box to hold 3x3 cards. It's a great way to present the cards to someone as a gift. They're easy and fun to make. Tomorrow I'll show you how to make some cute cards that match the box. When you're done crafting with me, you'll have a fabulous gift to share with someone!

Monday, January 18, 2010

Occassions Mini catalog card #1


Today I'll show you how to make a quick and simple card using products from the Occassions mini catalog. In this card, the embellishments and products do the "beautifying" work, so you can create this in just a few minutes. If you ordered the I WANT EVERYTHING product share, you have all the materials you need (minus the stamp sets) to create this card exactly. If you don't own these stamp sets, don't worry. In this design, you can easily substitute with stamp sets you already own.

If you'd like to order the I WANT EVERYTHING product share, you can do so on the right hand sidebar.

Tomorrow, I'll show you another fun project you can create with your new Occassions mini catalog items :)

Enjoy the video!!

Saturday, January 16, 2010

Baby Shower Diaper Cake and Favors


Boy, am I tired!! The shower went great and we all had a good time. I snapped a few pictures before it started to show you the diaper cake I made and the party favors. I just used paper, some punches, one wheel and 1 stamp and made everything coordinate. The baby stamp I used was one that I got free from Sale-a-bration a few years ago. I don't own any baby stamps because who thought I would ever use them since I have teens. But this year I hosted 4 !!! yes, 4 baby showers (and attended 2 others). I've gotten very creative for those showers :)
The first picture is of the baby shower invitation.


The second picture is of a 12x12 scrapbook page that I made that we placed on the podium when we entered. The mom can then use that as her first page in the baby's album.

Anyway, in the photos, you'll see the diaper cake. The diapers are rolled and secured with rubberbands and each circle has a large rubber band around it. I covered those rubberbands with the paper strip. I had to cut several lengths of paper, then I used an edge punch, then I used adhesive to adhere the strips together and then wrapped around the cake. I then decorated the strips with punched stars and a punched baby poem centered on a scallop circle. I think it turned out cute! My friend, Amy, found a pooh bear to put on top and that was the cherry on top :)

The shower favors are 2-4-6-8 boxes. I have a video tutorial on how to make them. It's a Valentine one from last year. For these boxes, I used a retired wheel and decorated the plain white paper. Then I formed the boxes and filled with Hershey kisses. Then I put a scalloped circle stamped baby poem on the front that was the same as I used on the diaper cake.
I hope these give you some ideas for a future shower you might hold. If you have any questions, feel free to email me :)
Happy Stamping!
Lisa

Friday, January 15, 2010

Under the Stars card for my DS


Next week, I will start daily pictures and video tutorials of things from the mini. That gives everyone a chance to order the stamps and accessories they want so we can start playing together. If you're interested in ordering product from the catalog or from one of my product shares, please email me at lunchlady42@comcast.net.

This is a short post today because I'm going to a friend's house. I made this card for my son who's in college. I have fun making him cards :)

Tomorrow's post will also be short too, as I've got a baby shower I'm holding. I'll show pictures of the diaper cake and shower favors I made :)

Next week, we'll start full swing with daily posts featuring things from the mini-catalog!!

Happy Stamping!
Lisa

Thursday, January 14, 2010

Stamp-a-ma-jig Video Tutorial

Hey, everyone! Here's video tutorial I made for the stamp-a-ma-jig. Although Stampin UP's clear mount stamps have lessened the need for using the stamp-a-ma-jig, there are still situations where you'll want/need the stamp-a-ma-jig. I've found there are too many stampers out there who are intimidated by it or don't understand how to use it. Hopefully, this video will help you to feel more comfortable using this invaluable tool! Enjoy!

Wednesday, January 13, 2010

With All My Love card


This is a great card that could be perfect for Valentine's Day or any occasion to give a friend. It features the following:

Stamp Set: With All My Love (clear mount) with block C
Cardstock: Chocolate Chip, Pretty In Pink, Very Vanilla
Ink: Chocolate Chip Classic Ink, Real Red Classic Ink
Designer Series Paper: Sending Love Specialty
Embellishments: Sending Love Epoxy Brad Chocolate Chip 1/4"
Punches: Wide Oval, Boho Blossoms, Extra Large Fancy Flower
Misc: dimensionals, adhesive, @-Way Glue Pen, Dazzling Diamonds

Here is the video :)

Tuesday, January 12, 2010

New Video Tutorial--mini notebook

Hi, everyone!

Here is the video tutorial for the mini notebook. I had a couple of flaws in filming and I went over the 10 minute time limit. So, you miss the last step where you adhere the notebook into the base with red sticky strip. I'll probably re do this video sometime in the future. But for now, here you go!

Monday, January 11, 2010

Altered mini notebook and matching pen


This is a gift set that I created using Stampin UP products. I orignally got the idea for creating these notebooks a year or so ago at Michelle Woodenson's blog. They're easy and fun and ADDICTIVE!! I love having one in my purse, by the phone and by the computer for all my notes :)

Here are the ingredients; a video will follow.

Ingredients for mini notepad:
5.5 x 8.25 Melon Mambo cardstock
2.5 x 8 Razzleberry Lemonade DSP
2.5 x 3 Razzleberry Lemonade DSP
MISC paper: Rich Razzleberry cardstock, Melon Mambo cardstock, Razzleberry Lemonade DSP for punching
Punches: Butterfly Punch, Modern Label Punch, Word Window Punch, Boho Blossoms Punch
Stamp Sets: Flight of the Butterfly, Teeny Tiny Words
Inks: White Craft ink
Embellishments: Rich Razzleberry polka dot ribbon, Sherbert Designer Buttons (pumpkin pie button), white embroidery thread from local craft store
MISC: White embossing powder, Heat Gun, Embossing Buddy, adhesive, dimensionals

Sunday, January 10, 2010

Video Tutorial for Altered Dentyne Gum


Here is the video for yesterday's project. I have to apologize for chewing gum through the video. I'm trying to lose a few pounds and chewing gum is helping me not snack throughout the day. I didn't notice for myself how noisy I was. I hope you can enjoy the video inspite of it. I'll make sure I'm not chewing gum in the future when I tape these.

Saturday, January 9, 2010

Altered Dentyne Gum


I altered this Dentyne Gum with Stampin Up Designer paper. I love making these. They are simple and fun. People have really enjoyed them and they hold up well. I hope you give it a try. A video will follow soon.


Supplies needed:


Paper- Whisper White cardstock, Rich Razzleberry cardstock, Crushed Curry Cardstock

Inks: Rich Razzleberry Classic Ink pad

Tools: Big Shot machine, Leaves Sizzlet, Modern Label punch, Word Window Punch, Scallop Circle Punch, Flower Trio Punch, 3/4" Circle Punch

Other: Crystal Brad, Rich Razzleberry polka dot ribbon, adhesive, dimensionals

Friday, January 8, 2010

Peace Within


Any stamp set that allows me to color, I just love. But I REALLY REALLY love this set. Not only does it have a cat in it, it has some great sayings. And it's got another fabulous all purpose image with flowers and a bird for watercoloring. LOVE IT!


Anyway, for this card, I chose a Rich Razzleberry card base. I used the Razzleberry Lemonaid designer paper. I stamped the image on watercolor paper and then used a blender pen and my in color ink pads (along with old olive (leaves) and several of the browns (for the chair)). The mat for the image is Crushed Curry. For the pillow the cat is lying on, I stamped the pillow on some Rich Razzleberry DSP, cut it out, and glued it on the image.


I like how it turned out. If you like it too, check out my etsy store :)

Wednesday, January 6, 2010

Sock Monkey Valentine's Day card


This a another fun card using the Sock Monkey stamp set. I just love paper piecing with this set. One thing about paper piecing is that you need good scissors like the SU paper snips!! When you cut, cut back deep into the scissors--don't cut using the tips. When you cut using the tips, it's not as smooth and is more choppy. Anyway, that's my tip :)


For this card, I used the Thoroughly Modern designer series paper. I love that the colors are not too girly, let it's still got enough to be suitable for Valentines. I think it will be a perfect card for anyone.


Here is the ingredient list:


Stamp Sets: Sock Monkey, Teeny Tiny Wishes


Cardstock:
Soft Suede - 4.25 x 11 and scored at 5.5
Bermuda Bay - 3.25 x 3
Very Vanilla - 3 x 2.75
Melon Mambo - 1 3/8 x 5.5
Thoroughyly Modern DSP- .75 x 5.5
misc pieces for punching

Designer Series Paper: Thoroughly Modern (for strip and paper piecing)

Ink: Soft Suede


Tools: Paper Snips, Scallop Edge Punch, Large Oval Punch, Modern Label Punch, Word Window Punch, Heart to Heart Punch

Don't forget for NEW PRODUCT SHARES to click http://stampuplisa.blogspot.com/2010/01/new-occassions-mini-catalog-product.html

Until tomorrow---happy stamping!!


Lisa

Tuesday, January 5, 2010

Video Tutorial for decorated Mentos gum container


Well, I finally got this video uploaded, after several errors. Boy, it takes a while to get in the groove when you've been gone!

Hope you enjoy the video. I will work on the camera position. I had to change from my best angle because of early morning sun throwing a shadow across my work at my larger table. So, I'll get that all worked out by the next video. For now, ignore the angle :)

If you're new to my site and you enjoyed the video. Check out my new Occassions mini product shares a few posts down. Purchase your supplies and you can craft with me :)

For those who have been to my site before, you might notice a change. I've started using labels on my posts. And I've gone back and edited a lot of old posts. You can find posts according to the Stamp sets used and the theme of the post. Anyway, I hope that makes your browsing more enjoyable.

Happy stamping!!

Lisa

Altered Mentos Gum for Valentine's Day


This is an example of the types of projects you'll be seeing in the upcoming months as I showcase the items in the Occassions Mini Catalog. See below if you'd like to purchase supplies so you can craft along with me.
This is an altered Mentos Gum for Valentine's Day.
It uses the following items.
2 7/8" x 4 7/8" Designer Series Paper
Real Red Card stock
Whisper White Cardstock
Real Red Classic Ink
1/4" Real Red Grosgrain Ribbon
Modern Label Punch
Word Window Punch
Heart to Heart Punch
Large Oval Punch
Small Oval Punch
Love You Much stampset
A Happy Heart Day Stampset
I taped a tutorial for it and am uploading it to Youtube. I'll have it on my blog tomorrow.

NEW Occassions Mini Catalog PRODUCT SHARES

I have some FABULOUS, FABULOUS shares to offer. Shipping within the United States is included in the prices.

Order your shares now. Then become a follower of my blog. I will be posting several projects with instructions on my blog (and some video lessons) each week until April 30th that use the items from these shares. If you order your share now, you'll be able to create with me for the next several months.


Designer Series Paper Share $7.95 includes 36 sheets of 6x6 paper from the following paper packs: Sending Love Specialty (glittered), Shades of Spring, and Sweet Pea.


5/8" Satin Ribbon Share $13.95 includes 2 yards each of 9 ribbons. Colors include: Bashful Blue, Pretty in Pink, Certainly Celery, Very Vanilla, Chocolate Chip, Old Olive, Real Red, Basic Gray, and Basic Black.


Designer Series Paper, Buttons and Brads Share $17.95 includes the following:
36 sheets of 6x6 designer paper from Sending Love Specialty, Shades of Spring and Sweet Pea designer series papers.
12 Sending Love Epoxy Brads: 2 each of 2 designs from the following packs 1/2" Pretty in Pink, 1/2" Real Red, 1/4" Chocolate Chip
12 Corduroy Buttons- 6 Pretty and Pink (2 each of 3 Styles) and 6 Real Red (2 each of 3 Styles)
BONUS: Sending Love Notes 1 Hugs, 1 Kisses


Satin Ribbon, Buttons and Brads Share $23.95 includes the following:
5/8" Satin Ribbon 2 yards each of 9 colors. Colors include: Bashful Blue, Pretty in Pink, Certainly Celery, Very Vanilla, Chocolate Chip, Old Olive, Real Red, Basic Gray, and Basic Black.
12 Sending Love Epoxy Brads: 2 each of 2 designs from the following packs 1/2" Pretty in Pink, 1/2" Real Red, 1/4" Chocolate Chip
12 Corduroy Buttons- 6 Pretty and Pink (2 each of 3 Styles) and 6 Real Red (2 each of 3 Styles)
BONUS: Sending Love Notes 1 Hugs, 1 Kisses; Stampin Up Beautiful Wings embosslit die cuts (3 spring colors)


I WANT IT ALL Share $31.95 includes the following Designer Papers, Ribbons, Buttons and Brads:
36 sheets of 6x6 designer paper from Sending Love Specialty, Shades of Spring and Sweet Pea designer series papers.
5/8" Satin Ribbon 2 yards each of 9 colors. Colors include: Bashful Blue, Pretty in Pink, Certainly Celery, Very Vanilla, Chocolate Chip, Old Olive, Real Red, Basic Gray, and Basic Black.
12 Sending Love Epoxy Brads: 2 each of 2 designs from the following packs 1/2" Pretty in Pink, 1/2" Real Red, 1/4" Chocolate Chip
12 Corduroy Buttons- 6 Pretty and Pink (2 each of 3 Styles) and 6 Real Red (2 each of 3 Styles)
BONUS: Sending Love Notes 1 Hugs, 1 Kisses; Stampin Up Beautiful Wings embosslit die cuts (3 spring colors), Sweet Pea Stitched Felt pieces (1 flower, 1 french knot, 1 leaves).


Monday, January 4, 2010

Crab and Company birthday card


My husband spent a lot of time with his grandparents in Maryland along the Chesapeake Bay area. Crabs are meaningful to him. So, I used the retired Crab and Company stamp set for his recent Birthday.

I used Sahara Sand as the base and stamped it with Itty Bitty Background stamp in Versamark ink. Then I used the shell stamps from Crab and Company on the background too.

For the red strip, I used the same Itty Bitty Background stamp with Versamark ink, then used miscellaneous eyelets (that I've had forever and have never used).

I stamped the main crab image with Staz On Black in onto watercolor paper. I used my markers to color it. I used real red along the edges, then used pumpkin pie to pull the red towards the center. To do the sand, I used the Sahara sand marker and a blender pen. Then I used Crystal Effects on the eyes to make them pop a bit.

The sentiment is from Crab and Co. I love it!! When DH opened the card, I have him a big pinch :) :) I used watercolor paper and Staz On to stamp it and then punched it with the Curly Label punch.

My husband really liked it :) So, it's my first card to post in 2010.

I'll be back tomorrow with a Valentine's treat project.

Lisa

Sunday, January 3, 2010

I'm baaacck!!

Sorry for the long absence. Life distracted me. We've had some major changes in 2009. It's been a very good year though. Although I stopped posting, I didn't stop making cards and other paper crafts. I just didn't take pictures of them. Sorry :( When my son comes home from college this summer, I'll take pictures of the cards I sent him. Those cards have been my recent masterpieces--they've centered around funny characters and weird humor--mainly I used Sock Monkey and the bear from Under the Stars (but they're in his dorm room).

The best camera in the house also happened to belong to DS (who took it to college with him). But for Christmas, I got a new camera, so I'm ready to start posting to my blog again.

I'll be posting regularly in 2010. I hope you'll visit often.

Lisa