Showing posts with label general card. Show all posts

Monday, March 26, 2012

Up, Up, & Away card


If you watched my haul video March 2012 Papertrey Ink Haul Video, you will know that I've been coveting the Papertrey Ink stamp set Up, Up & Away for a while.  It was the first stamp set I broke out to play with.   And this is my first creation.   I really love PTI's sentiments.   They are fun to combine.   The outside sentiment came from Pond Life ( a $5 stamp set with great sentiments).   And the inside one came from Up, Up, and away.

It is a fun set to play with.   I am looking forward to making more airballoons but coloring them.   And the sentiments are awesome and make this set very versatile.   I have so many more ideas for this set and I can't wait to play with it some more.  But then, I also have all these other new sets calling to me!!  LOL!   Such the difficult life of a crafter :)

If you'd like to see how I made this card, you can watch this video.  ( Oh boy, I can't believe the image youtube captured is of my dental appointment reminder card.   I quickly grabbed this contrasting paper so I could see to stamp on some white cardstock.  Ugghh.  I am making a note to have dark cardstock on hand at my filming station next time!!!  If you don't see the black postcard with the smiling tooth, you'll know I've succesfully changed the image on youtube!!)


Hope you have an awesome day, I"ll see you next time!!

Lisa

Friday, June 12, 2009

More Coloring Therapy


After doing the bunny I still wanted to color! So, I pulled out one of my Level 2 hostess sets from this catalog. I used More Mustard, Old Olive, and Chocolate Chip cardstock. I stamped Sanded background on the More Mustard cardstock with More Mustard classic ink. Then I stamped the french mini background in Chocolate Chip classic ink on top of it. It took 6 times to fill in the background. I used my stamp a ma jig to line it up. I sponged the edges of the Chocolate Chip and Old Olive cardstocks in Chocolate Chip classic ink. Then I stamped the swirled image from this set in Chocolate Chip classic ink on the Chocolate Chip cardstock. You can probably just barely tell, but it does add to the look. I stamped the rooster image in Black Staz On ink onto water color paper. I used Stampin Up markers to color in the image.

Tuesday, June 9, 2009

Embossed Reinker Spread technique


I learned this technique from Patty Bennett's site. pattystamps.typepad.com/pattys_stamping_spot

I learned that you have to use white craft ink. Versamark won't work. (the reinker soaks into the paper and goes under the embossed areas, so that you no longer have a clean white outline). I also learned that Stampin UP's Shimmery White cardstock is the best for this technique. The other papers I tried, whisper white cardstock and glossy white cardstock, didn't give me as good results.

We made this card when I met with my downline :) Each rose turns out unique and there's no going wrong!! :)

We used Rose Red cardstock, Cameo Coral cardstock, Shimmery White cardstock, Old Olive cardstock, Fifth Avenue Floral stamp set, Oval All stamp set, Top Note Die, Leaves sizzlit, Scallop Oval punch, Large Oval punch, Cameo Coral reinker, Rose Red reinker, Summer Sun reinker, Whisper White craft ink, Clear embossing powder, embossing buddy and embossing heat gun, and aqua painters.

Monday, June 8, 2009


This is a quick and easy card that we made in my May class :) It uses the Fifth Avenue Floral stamp set for the self created background paper and the Oval All stamp set for the sentiment. We used Kiwi Kiss, Baja Breeze, and Not Quite Navy. That's one of my favorite combinations! I'm going to miss these in colors. But I'm looking forward to the new in colors :)

Saturday, May 30, 2009

Quick and simple Great Friends card


This is a quick and simple great friends card. I used pink pirouette and riding hood red cardstock and inks (boo hoo, they're leaving us :( ). This card is really self explanatory. The one tip I can give you about stamping images to make your own background is 1) stamp off the paper too. You don't want all your images perfectly within the confines of your paper. Afterall if you bought designer paper and cut it, some of those butterflies and flowers would be cut off in the middle. 2). Turn your stamp every which way when you stamp. You want your butterflies to be facing different directions and even upside down or to the side, same with the flowers on the top part.

Friday, May 29, 2009

Great Friend


My upline let me borrow the stamp set Great Friend from her. I really had fun with it. I love the sentiment and the frame that comes with this set. The butterflies are so pretty and are suprisingly easy to cut out. I used all in colors for this card. I'm going to be so sad when they leave.

Monday, May 25, 2009

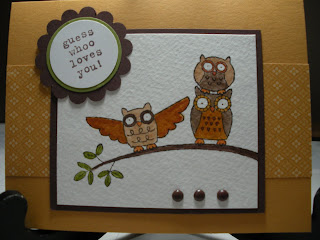
Owl Together Now


This is a card using the stamp set Owl Together Now. I used the same technique as shown in the video below. It utilizes watercolor paper and the Stampin UP markers.

Inside the card, it says "owl of us!" I used my chocolate chip marker to color just that part of a stamp that has a longer phrase.

Saturday, May 23, 2009

A Kind Word


A Kind Word is one of the best new stamp sets to color! I love the three images in this set. On this one, I used the tree branch from Owl Together and the girl from A Kind Word. I used Brocade Blue and Yellow Saffron together for the first time, and I LOVE how they look! I'll definitely be repeating this combination.

I hope you enjoy this card! I'll be posting a video tutorial tomorrow on my coloring technique.

Wednesday, April 22, 2009

Forest Friends with shrubs


This is another Forest Friends card. I know I've been overwhelming you with them. This is the last one for a while (I think). If you've watched my video tutorial on this, you'll know how I made the hill. On this card, I've added some shrubs.

Here's how I did the shrubs. You know the paper that you tore for the hill? Keep the bottom half. You'll use both pieces to make this card. You use the top half, when you block off the upper page and sponge the bottom to make the hill. When you're done, you'll take the lower piece of torn paper and use it to cover the hill you just sponged. HINT: leave a tiny bit of hill showing above your torn paper (this will make sure your shrubs are grounded and not floating). Then ink up your tree stamp in solid green and stamp at the bottom to make a shrub. If you want, you can use your ruby red marker to make little berries on the shrub.

The butterfly is also a neat touch and it came from the set Branch Out.

If you have any questions, from my above explanation, please let me know.

Monday, April 20, 2009

Petal Pizzaz card


This is a card I made using the Stamp set Petal Pizzaz. I'd entered it into the monthly SU Demo contest. It didn't win, but it's one of my favorites :)

Recipe:
Stamp set: Petal Pizzaz
Cardstock: Rose Red, Old Olive, Kiwi Kiss, Whisper White
Designer Series Paper: Raspberry Tart
Inks: Regal Rose, Rose Red, Kiwi Kiss, Old Olive
Tools: scissors, Scallop circle Punch, paper piercer
Accessories: Two Way Glue Pen, Dazzling Diamonds, Filigree brads, silver brads

Thursday, April 16, 2009

Inspired by Nature/ Chalkboard Technique in purples


This is just like my previous Inspired by Nature chalkboard card, except I changed the colors this time to the purples that are in the bold brights family. I'm a purple lover!! But I really like the pink/red tone one I did too. I just love the Inspired by Nature set.

I also used Oval All and the new Scallop Oval punch, and the sentiment was punched with the large oval.

Tuesday, April 14, 2009

Branch Out

his

This is a quick card made with the set Branch Out. I used the same sponging and masking technique I did with the Forest Friends card to make the ground.

I love all the little accessories that come with the tree. I can't wait to play more with this set. But it might take me a few days. I'm in the middle of cleaning & reorganizing up my scrapbook/stamp room that also serves as our home library and catch all. You know how it is when you clean something like that. For a while there, it looks worse than when you started.

Monday, April 13, 2009

Forest Friends


These are two more cards I made using Forest Friends. They're all very similar. I made several trying to figure out the best way to do the hill. Once I figure out how to make my hill by masking and sponging (as I showed in the video), I went to town making several MORE different cards. Tomorrow I'll show you something different.

Friday, April 10, 2009

Another Forest Friends card


This is one of the first Forest Friends cards I made. I love the dark rich colors in this one, but unfortunately, my picture is also dark :( This card takes a bit more time because I stamped the deer on creamy caramel cardstock and then cut him out and popped him up with dimensionals. Looks good though :)

Wednesday, April 8, 2009

Forest Friends card & video tutorial


Ever have one of those days where Murphy's Law hits? Well, it hit me several times while filming the video! LOL! So, this video tutorial is broken into two segments. I've made lots of cards with this set and you'll be seeing them over the next week. I hope you enjoy them :)


Saturday, March 28, 2009

HOPE Card with Shaving Cream Technique


My husband has been sending HOPE cards to a lady (who is like a mother to him) to encourage her as her MS symptoms increase. So, I always use the same stamp for the card but try to make it look different. This week I made one with an extra sheet of my shaving cream technique papers. He really liked how it turned out and declared it my best HOPE card. I don't know about that, but I'll take it ;-)

Tuesday, March 24, 2009

Inspired by Nature meets the chalkboard technique


We made this card at Debra's party last night. I love this stamp set, Inspired By Nature. It looks good however you use it and is so versatile. It's not in the catalog but it still available to order.

Doesn't it look great with the chalkboard technique? When I've done this card before, people thought the image was painted. LOL!! It's actually a super quick and easy card.

The chalkboard technique is simple but there are a couple of hints to be successful. To do the chalkboard technique you need a piece of dark cardstock andwhisper white craft ink. After you stamp your image in the white craft ink, you chalk up a sponge dauber and lightly tap onto the colored chalk onto the white craft ink. DO NOT RUB THE DAUBER OR TAP HARD as this will ground the chalk into the paper. When you are done chalking up your image, blow off the extra chalk. I also like to use a flat soft paintbrush to brush away the extra chalk. If there is a haze around your image, lightly rub your fingers on the cardstock to remove any haze (the slight oil/moisture from your hands will remove that last bit).